Prepare the data
The MELD pipeline relies on the MRI data to be organised in the MELD or BIDS format.
If you are preparing the data for the harmonisation step, you will also need to prepare the demographic information.
MRI data
MELD graph requires a 3D T1 (WITHOUT gadolinium agent) and it is optional but advised to include the 3D FLAIR. MELD Graph has been trained on scans acquired 1.5T and 3T.
It has not been evaluated on:
other MRI scans contrast than T1 and FLAIR
MRI scans with gadolinium
2D MRI scans
scans acquired <1.5T and >3T
It is not appropriate to use this algorithm on patients with:
tuberous sclerosis
suspected hippocampal sclerosis
hypothalamic hamartoma
periventricular nodular heterotopia
other focal epilepsy pathologies
previous resection cavities
Prepare the MRI data (Mandatory)
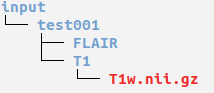
In the ‘input’ folder where your meld data has/is going to be stored, create a folder for each patient with the ID of the subject.
Convert DICOMs to NIfTI
The input data needs to be in ‘NIfTI’ format (‘.nii.gz’). If you have DICOM files you will need to convert them in NIfTI. If you already have the data in NIfTI, you can skip this.
To convert DICOMs to NIfTI, you can use the ‘mri_convert’ function from FreeSurfer.
Open a terminal and cd to the meld graph folder.
DOCKER_USER="$(id -u):$(id -g)" docker compose run -v "<path_to_dcm>:/data_dcm" meld_graph mri_convert /data_dcm/<name_of_first_dcm> /data_dcm/<name_of_output_nii>
with:
<path_to_dcm> : the path where the dicom folder is saved.
<name_of_first_dcm> : the name of the first dicom file (.dcm) in the dicoms folder.
<name_of_output_nii> : the name of the output nifti file. It will need to finish by ‘.nii.gz’.
Example:
DOCKER_USER="$(id -u):$(id -g)" docker compose run -v "/home/user/sub001_dcm:/data_dcm" meld_graph mri_convert /data_dcm/Snake_sub001.Seq3.Ser202.Img1.dcm /data_dcm/T1.nii.gz
Note: Ensure that there is no space in the path to your dicom and nifti file or the command will fail
WINDOWS USER: On windows, you do not need the DOCKER_USER="$(id -u):$(id -g)" part
Open a terminal and cd to the meld graph folder.
You will need to first activate FreeSurfer
export FREESURFER_HOME=<freesurfer_installation_directory>
source $FREESURFER_HOME/SetUpFreeSurfer.sh
Then run the command
mri_convert <path_to_first_dcm> <path_to_output_nii>
with:
<path_to_first_dcm> : the path of the first dicom file (.dcm) in the dicoms folder.
<path_to_output_nii> : the path of the output nifti file. It will need to finish by ‘.nii.gz’.
Example:
mri_convert /home/user/sub001_dcm/Snake_sub001.Seq3.Ser202.Img1.dcm /home/user/sub001_dcm/T1.nii.gz
Note: Ensure that there is no space in the path to your dicom and nifti file or the command will fail
MELD format
Chose a subject ID: Please ensure that the subject ID is not just a number. For example, if your id is 0001, ensure to add a letter, such as P0001
In each subject folder, create a T1 and FLAIR folder.
Place the T1 nifti file into the T1 folder.
Place the FLAIR nifti file into the FLAIR folder.
BIDS format
The MELD pipeline now accept BIDS format as input data. For more information about BIDS format, please refers to their instructions
The main key ingredients are :
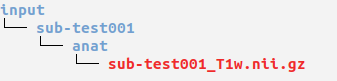
each subject has a folder following the structure :
sub-<subject_id>(optional) in each subject folder you can have a session folder, e.g.
ses-preop.in each session folder / subject folder you will need to have a datatype folder called
anatfolder.in the anat folder your T1 and FLAIR nifti images should follow the structure :
sub-<subject_id>_<modality_suffix>.nii.gzorsub-<subject_id>_ses-<session>_<modality_suffix>.nii.gzif you have a session.
A simple example of the BIDS structure for patient sub-test001 is given below:
Additionally, you will need to have two json files in the input folder:
meld_bids_config.jsoncontaining the key words for session, datatype and modality suffix
Example:{"T1": {"session": null, "datatype": "anat", "suffix": "T1w"}, "FLAIR": {"session": null, "datatype": "anat", "suffix": "FLAIR"}}
dataset_description.jsoncontaining a description of the dataset
Example:{"Name": "Example dataset", "BIDSVersion": "1.0.2"}
Prepare the demographic information (required only to compute the harmonisation parameters)
To compute the harmonisation parameters, you will need to provide a couple of information about the subjects into a csv file.
You can copy the demographics_file.csv that you can find in your <meld_data_folder> and create a new version of it with the harmonisation code demographics_file_<harmo_code>.csv. (e.g demographics_file_H1.csv)

ID : subject ID (this should be the same ID than the one used to create the MRI folder)
Harmo code: the harmonisation code associated with this subject scan (need to be the same for all the subjects used for the harmonisation)
Group: ‘patient’ if the subject is a patient or ‘control’ if the subject is a control
Age at preoperative: The age of the subject at the time of the preoperative T1 scan (in years)
Sex: ‘male’ if the subject is a male or ‘female’ if the subject is a female
Warning
please ensure the column names are unchanged and completed with the appropriate values, otherwise the pipeline will fail.
please make sure you add the appropriate age and sex of the patients. Adding dummy information can lead to suboptimal harmonisation.
please ensure that there is non-zero variance in the age of your subjects. Similar age for all subjects will lead to harmonisation failure. If your patients have the same age, please add randomly +- 0.01 to all age to introduce variance.
FAQs
Please see our FAQ page for common questions about data preparation